How to Do the Seated Cable Row: Muscles Worked, Form, and Alternatives
The seated cable row is a proven back builder.
Sometimes also called the “cable seated row,” this exercise effectively trains your entire back (yes, even your lats). Since you perform it sitting upright, it places much less stress on your spine, making it an excellent option for people with lower-back issues.
You can also modify the exercise to suit your preferences and anatomy by using different handles.
As with any exercise, though, you have to use proper form if you want to reap the benefits.
In this article, you’ll learn everything you need to know about the seated cable row, including what the seated cable row is, its benefits, which muscles it works, how to use proper seated cable row form, the best seated cable row alternatives, and more.
- What Is A Seated Cable Row?
- Seated Cable Row: Benefits
- 1. It trains your entire back.
- 2. It’s ideal for people with lower-back problems.
- 3. It’s highly adaptable.
- Seated Cable Row: Muscles Worked
- Seated Cable Row: Form
- 1. Set Up
- 2. Row
- 3. Extend
- The Best Seated Cable Row Alternatives
- 1. Single-Arm Cable Row
- 2. Standing Low Cable Row
- 3. Wide-Grip Cable Row
- 4. Neutral-Grip Cable Row
- 5. Reverse-Grip Cable Row
Table of Contents
What Is A Seated Cable Row?
The seated cable row is a back exercise in which you sit upright and pull a weight toward your torso.
Typically, you perform the seated cable row using a “cable row machine,” though you can use any other cable pulley machine if there isn’t a cable row machine at your gym.
Not all cable rowing machines are the same, but most consist of a padded seat, a footrest, and a handle attached to a cable that’s loaded with weight plates.
Seated Cable Row: Benefits
1. It trains your entire back.
Many people think that vertical pulling exercises develop your lats, which makes your back wider, whereas horizontal pulling exercises develop your traps, rhomboids, and teres muscles, which makes your back thicker.
This isn’t based on any sound scientific reasoning, though, and is essentially just gym lore. Research shows that horizontal pulling exercises, like the seated cable row, train your entire back, including your lats (perhaps even slightly better than vertical pulling exercises like the pull-up and lat pulldown).
Thus, all horizontal back exercises, including the seated cable row, make your back thicker, wider, and stronger.
2. It’s ideal for people with lower-back problems.
Unlike many other compound back exercises, such as the barbell row and deadlift, the seated cable row doesn’t place much load on your spine when performed correctly.
This makes it ideal for people trying to train around a back injury.
3. It’s highly adaptable.
There are several different handle attachments that you can use with the cable seated row that allow you to vary grip orientation (which way your palms face) and width while you perform the exercise.
The most common variation (and the one we’ll focus on in this article) is the close-grip seated cable row, which is also often referred to as the “V-bar cable row” or simply the “seated cable row.” It uses a V-bar attachment that places your hands about 6-to-8 inches apart with your palms facing each other.
Other popular variations include the . . .
- Neutral-grip cable row, which places your hands about 18-to-24 inches apart with your palms facing each other.
- Wide-grip cable row, which involves a pronated (palms facing the floor) grip just outside shoulder-width apart.
- Reverse-grip cable row, which involves a supinated (palms facing upward) grip about shoulder-width apart.
Some people say that changing your grip on the seated cable row greatly impacts which muscles you train, but this is over-egging the pudding. It likely changes which muscles you emphasize to a small degree, but it’s difficult to say whether this has any meaningful effect on long-term muscle growth.
That said, I think experimenting with your grip is useful because it allows you to find what’s comfortable, and it helps liven up your training when things get stale.
A good way to do this is to try different grip widths and handle attachments until you find two or more that you like, then alternate between your favorites every 8-to-10 weeks of training.
This is how I personally like to organize my training, and it’s similar to the method I advocate in my fitness books for men and women, Bigger Leaner Stronger and Thinner Leaner Stronger.
Seated Cable Row: Muscles Worked
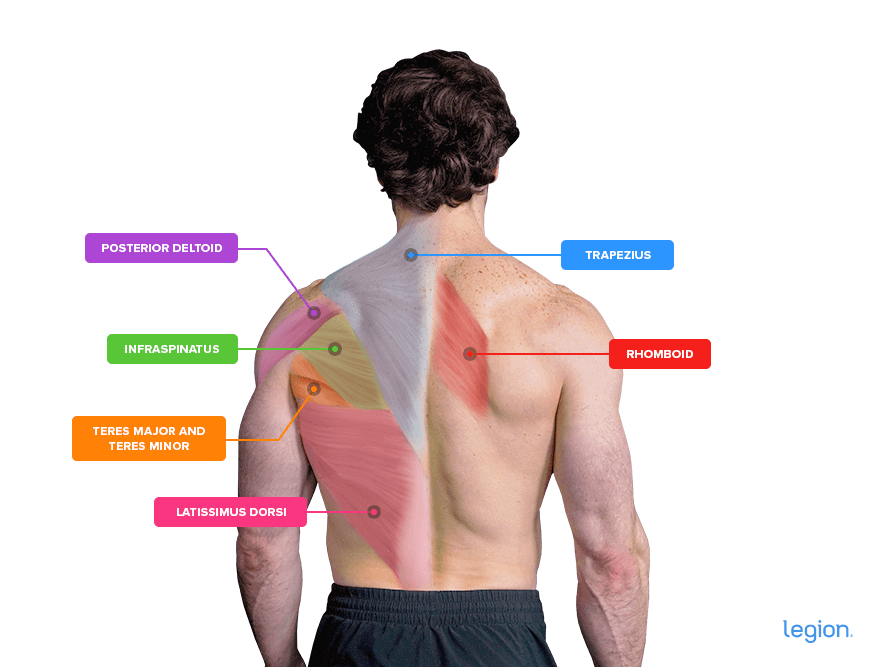
The seated cable row trains nearly all of your back muscles, including the. . .
- Latissimus dorsi
- Trapezius
- Rhomboids
- Teres major and minor
- Infraspinatus
- Posterior deltoid
It also works the erector spinae, forearms and biceps brachii to a lesser extent, too.
Here’s how the main back muscles worked by the seated cable row look on your body:

Seated Cable Row: Form
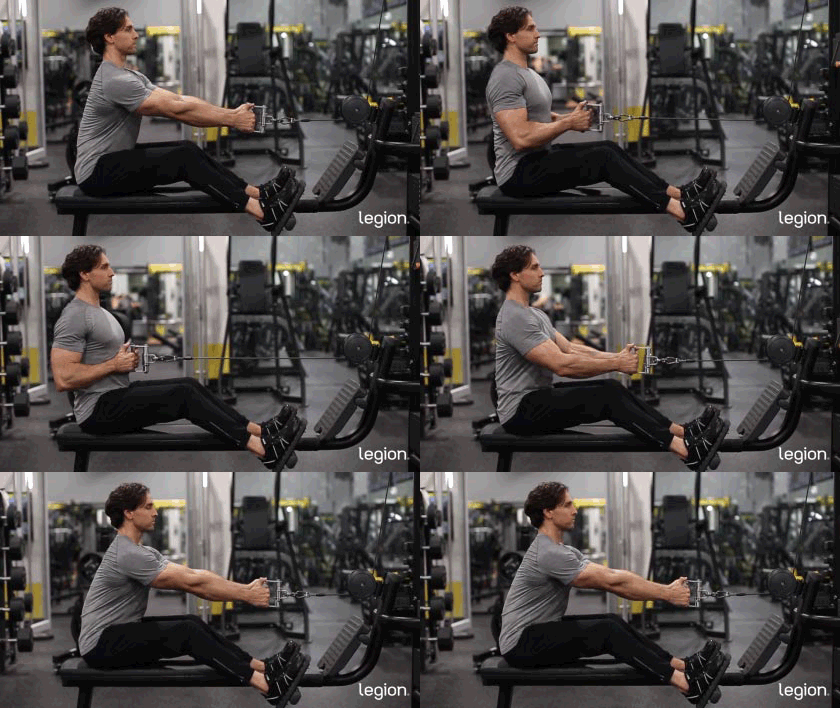
The best way to learn how to perform the seated cable row is to break it into three parts: set up, row, and extend.
1. Set Up
Attach the V-bar handle to the cable row machine, then sit on the seat and place your feet on the footrest, maintaining a slight bend in your knees.
Lean forward and grab the handle with both hands, then lean back until you’re sitting upright with your back flat and chest up, and your arms are stretched out in front of you.
2. Row
Keeping your back upright, pull the handle to your abdomen, allowing your torso to move backward just enough to help you finish the rep, but no more. Continue pulling until the handle touches your torso and your elbows are about 4-to-6 inches from your sides.
(Tip: A helpful cue is to imagine touching the wall behind you with your elbows.)
3. Extend
Once the handle touches your torso, reverse the movement and return to the starting position. This is a mirror image of what you did during the row.
Don’t let the weight yank your arms back to the starting position or try to extend your arms slowly. The entire “extension” should be controlled but only take about a second.
Here’s how it should look when you put it all together:

The Best Seated Cable Row Alternatives
1. Single-Arm Cable Row
The single-arm seated cable row (also known as the “one-arm cable row”) is a seated cable row alternative that you perform using a single handle attachment and one arm at a time.
The single-arm cable row trains your body unilaterally (one side at a time). As such, it has four main benefits:
- It may enable you to lift more total weight than you can with some bilateral seated cable row alternatives (alternatives that train both sides of the body at the same time), which is beneficial for muscle and strength gain.
- It allows you to focus on one side of your body at a time, which can help you develop a stronger mind-muscle connection.
- It trains your body unilaterally, which means it helps fix muscle imbalances.
- It effectively trains your core muscles, which have to work hard to prevent your body from twisting.
2. Standing Low Cable Row
The standing low cable row (also referred to as the “bent over cable row”) involves setting the pulley on a cable machine to the lowest setting, attaching the V-bar handle, bending forward at the hips, and pulling the handle to your torso.
While the standing low cable row trains your lower back more than seated variations, it’s also more unstable (the cable tends to drag you forward), which means most people find they have to use less weight, diminishing the muscle- and strength-building potential of the exercise.
That’s why this isn’t my favorite seated cable row alternative, but it can be a viable option if you don’t have access to a cable row machine or bench.
3. Wide-Grip Cable Row
To perform the seated wide-grip cable row, attach the lat pulldown bar to the cable row machine, place your hands outside of shoulder-width apart with your palms facing the floor, and pull the bar to your torso while flaring your elbows so that they finish 12-to-18 inches from your sides.
Using a wider grip and adjusting your form slightly emphasizes slightly different muscles than the standard seated cable row. Specifically, the wide-grip seated cable row trains your upper back and rear delts more than your lats.
4. Neutral-Grip Cable Row
The neutral-grip cable row is similar to the wide-grip cable row, but instead of using a straight bar, you use a bar that allows you to take a neutral (palms facing each other) grip.
The neutral-grip cable row trains your back muscles similarly to the wide-grip cable row, making it a viable seated cable row alternative. The only potential drawback is that some people find the neutral grip uncomfortable for their shoulders.
5. Reverse-Grip Cable Row
To perform the reverse-grip cable row (also known as the “underhand cable row” or “supinated cable row”), attach the straight bar to the cable row machine, place your hands shoulder-width apart with your palms facing up, and pull the bar to your torso while slightly tucking your elbows so that they finish about 6-to-8 inches from your sides.
One of the benefits of performing the seated cable row with a supinated (palms up) grip is that it increases how much your biceps contribute to the exercise, which means your arms get extra training (albeit indirectly), and you can lift more weight. The downside, however, is that as the weights gets heavier, many people find using a supinated grip aggravates the tendons in their elbows and shoulders.
The post How to Do the Seated Cable Row: Muscles Worked, Form, and Alternatives appeared first on Legion Athletics.
https://ift.tt/DehW5bP June 28, 2022 at 06:00PM Legion Athletics
Comments
Post a Comment